Posted in
Windows Powershell,
Windows Server |
No Comment | 3,301 views | 03/07/2014 11:34
You can use following script to get pwdlastset value of a computer:
1
| [datetime]::fromfiletime((Get-ADComputer SLESGTRM04 -Properties pwdlastset).pwdlastset) |
[datetime]::fromfiletime((Get-ADComputer SLESGTRM04 -Properties pwdlastset).pwdlastset)
Also you can use conditional query:
1
2
| $RefDate = (Get-Date).AddDays(-90)
Get-ADComputer -Filter * -Properties pwdlastset | Where {[datetime]::fromfiletime($_.pwdlastset) -lt $RefDate} |
$RefDate = (Get-Date).AddDays(-90)
Get-ADComputer -Filter * -Properties pwdlastset | Where {[datetime]::fromfiletime($_.pwdlastset) -lt $RefDate}
If you want to filter workstations:
1
2
| $RefDate = (Get-Date).AddDays(-90)
Get-ADComputer -Filter * -Properties pwdlastset,OperatingSystem | Where OperatingSystem -like "*Server*" | Where {[datetime]::fromfiletime($_.pwdlastset) -lt $RefDate} |
$RefDate = (Get-Date).AddDays(-90)
Get-ADComputer -Filter * -Properties pwdlastset,OperatingSystem | Where OperatingSystem -like "*Server*" | Where {[datetime]::fromfiletime($_.pwdlastset) -lt $RefDate}
I hope you will find it helpful. Script should run on Windows Server 2012 and later..
Posted in
Windows Powershell,
Windows Server |
No Comment | 3,082 views | 30/06/2014 17:32
You can use following script to get Port and Fabric WWN information from FCinfo via PowerShell.
1
2
3
4
5
6
7
8
9
10
11
12
13
14
15
16
17
18
19
20
21
22
23
24
25
26
27
28
29
30
31
32
33
34
35
36
37
38
39
40
41
42
43
44
45
46
47
| # Get FCInfo Details
$FcToolCmd = "C:\StorageTools\fcinfo\fcinfo.exe /details"
# Create WWN Array
$WWNArray = @()
# Create Hash Table
$WWNInformation = @{}
# Port WWN Information
$FabricDetails = Invoke-Expression $FcToolCmd | Where {$_ -match "port_wwn"}
foreach ($FabricInfo in $FabricDetails)
{
# Get Port WWN
$FabricRegex = $FabricInfo -match "\b\S{2}\:\S{2}\:\S{2}\:\S{2}\:\S{2}\:\S{2}\:\S{2}\:\S{2}\b"
$PortWWN = $Matches[0]
# Add Hash Table
$WWNInformation."$PortWWN" = "NULL"
# Add WWN Array
$WWNArray += $PortWWN
}
# Fabric Index
$FabricIndex = 0;
# Fabric WWN Information
$FabricDetails = Invoke-Expression $FcToolCmd | Where {$_ -match "fabric"}
foreach ($FabricInfo in $FabricDetails)
{
# Get Fabric WWN
$FabricRegex = $FabricInfo -match "\b\S{2}\:\S{2}\:\S{2}\:\S{2}\:\S{2}\:\S{2}\:\S{2}\:\S{2}\b"
$FabricWWN = $Matches[0]
# Get Port WWN
$PortWWN = $WWNArray[$FabricIndex]
# Add Hash Table
$WWNInformation."$PortWWN" = "$FabricWWN"
# Update Fabric Index
$FabricIndex++
}
# Output Results
$WWNInformation |
# Get FCInfo Details
$FcToolCmd = "C:\StorageTools\fcinfo\fcinfo.exe /details"

# Create WWN Array
$WWNArray = @()

# Create Hash Table
$WWNInformation = @{}

# Port WWN Information
$FabricDetails = Invoke-Expression $FcToolCmd | Where {$_ -match "port_wwn"}
foreach ($FabricInfo in $FabricDetails)
{
	# Get Port WWN
	$FabricRegex = $FabricInfo -match "\b\S{2}\:\S{2}\:\S{2}\:\S{2}\:\S{2}\:\S{2}\:\S{2}\:\S{2}\b"
	$PortWWN = $Matches[0]

	# Add Hash Table
	$WWNInformation."$PortWWN" = "NULL"

	# Add WWN Array
	$WWNArray += $PortWWN
}

# Fabric Index
$FabricIndex = 0;

# Fabric WWN Information
$FabricDetails = Invoke-Expression $FcToolCmd | Where {$_ -match "fabric"}
foreach ($FabricInfo in $FabricDetails)
{
	# Get Fabric WWN
	$FabricRegex = $FabricInfo -match "\b\S{2}\:\S{2}\:\S{2}\:\S{2}\:\S{2}\:\S{2}\:\S{2}\:\S{2}\b"
	$FabricWWN = $Matches[0]

	# Get Port WWN
	$PortWWN = $WWNArray[$FabricIndex]

	# Add Hash Table
	$WWNInformation."$PortWWN" = "$FabricWWN"

	# Update Fabric Index
	$FabricIndex++
}

# Output Results
$WWNInformation
That will give you a hashtable as a result, so you can see details.
Posted in
Windows Powershell,
Windows Server |
No Comment | 38,084 views | 27/06/2014 09:55
Following scripts require EMC Storage Integrator (ESI) PowerShell Toolkit (ESIPSToolkit).
Getting EMC Storage Snapshot Pools:
1
2
3
4
5
6
7
8
9
10
11
12
13
14
| Import-Module ESIPSToolkit
function Get-EMCStorageSnapPools {
$Storages = Get-EMCStorageSystem
foreach ($Storage in $Storages) {
$GlobalID = $Storage.GlobalID
$Snappool = Get-EMCSnapshotPool | Where StorageSystemGlobalId -eq $GlobalID
$Properties = New-Object Psobject
$Properties | Add-Member Noteproperty StorageName $Storage.UserFriendlyName
$Properties | Add-Member Noteproperty AvailableCapacity $Snappool.AvailableCapacity
$Properties | Add-Member Noteproperty UserCapacity $Snappool.UserCapacity
Write-Output $Properties
}
}
Get-EMCStorageSnapPools |
Import-Module ESIPSToolkit
function Get-EMCStorageSnapPools {
	$Storages = Get-EMCStorageSystem
	foreach ($Storage in $Storages) {
		$GlobalID = $Storage.GlobalID
		$Snappool = Get-EMCSnapshotPool | Where StorageSystemGlobalId -eq $GlobalID
		$Properties = New-Object Psobject
		$Properties | Add-Member Noteproperty StorageName $Storage.UserFriendlyName
		$Properties | Add-Member Noteproperty AvailableCapacity $Snappool.AvailableCapacity
		$Properties | Add-Member Noteproperty UserCapacity $Snappool.UserCapacity
		Write-Output $Properties
	}
}
Get-EMCStorageSnapPools
Getting Storage List:
1
2
3
| Import-Module ESIPSToolkit
$Storage = Get-EMCStorageSystem
$Storage.UserFriendlyName |
Import-Module ESIPSToolkit
$Storage = Get-EMCStorageSystem
$Storage.UserFriendlyName
Getting Storage Thin Pools:
1
2
3
4
5
6
7
8
9
10
11
12
13
14
15
16
17
18
19
| Import-Module ESIPSToolkit
function Get-EMCStorageThinPools {
$Storages = Get-EMCStorageSystem
foreach ($Storage in $Storages) {
$GlobalID = $Storage.GlobalID
$Thinpool = Get-EMCStoragePool | Where SupportsThinProvisioning -eq "True" | where StorageSystemGlobalId -eq $GlobalID
foreach ($Pool in $Thinpool) {
$Properties = New-Object Psobject
$Properties | Add-Member Noteproperty StorageName $storage.UserFriendlyName
$Properties | Add-Member Noteproperty PoolName $pool.Name
$Properties | Add-Member Noteproperty TotalCapacity $pool.TotalCapacity.ValueGB
$Properties | Add-Member Noteproperty AvailableCapacity $pool.AvailableCapacity.ValueGB
$Properties | Add-Member Noteproperty SubscribedCapacity $pool.SubscribedCapacity.ValueGB
Write-Output $Properties
}
}
}
Get-EMCStorageThinPools |
Import-Module ESIPSToolkit
function Get-EMCStorageThinPools {
	$Storages = Get-EMCStorageSystem
	foreach ($Storage in $Storages) {
		$GlobalID = $Storage.GlobalID
		$Thinpool = Get-EMCStoragePool | Where SupportsThinProvisioning -eq "True" | where StorageSystemGlobalId -eq $GlobalID

		foreach ($Pool in $Thinpool) {
			$Properties = New-Object Psobject
			$Properties | Add-Member Noteproperty StorageName $storage.UserFriendlyName
			$Properties | Add-Member Noteproperty PoolName $pool.Name
			$Properties | Add-Member Noteproperty TotalCapacity $pool.TotalCapacity.ValueGB
			$Properties | Add-Member Noteproperty AvailableCapacity $pool.AvailableCapacity.ValueGB
			$Properties | Add-Member Noteproperty SubscribedCapacity $pool.SubscribedCapacity.ValueGB
			Write-Output $Properties
		}
	}
}
Get-EMCStorageThinPools
Registering Host:
1
2
3
| $StorageArray = Get-EMCStorageSystem "CX4_1"
$HostRegistration = "C0:03:FF:00:00:FF:FF:00:C0:03:FF:65:4D:A6:00:00","C0:03:FF:00:00:FF:FF:00:C0:03:FF:37:25:4E:00:16"
$RegisterHost = New-EMCStorageRegisteredHost -StorageSystem $StorageArray -HostName "Server01" -IpAddress "192.168.0.114" -HostBusAdapterIds $HostRegistration |
$StorageArray = Get-EMCStorageSystem "CX4_1"
$HostRegistration = "C0:03:FF:00:00:FF:FF:00:C0:03:FF:65:4D:A6:00:00","C0:03:FF:00:00:FF:FF:00:C0:03:FF:37:25:4E:00:16"
$RegisterHost = New-EMCStorageRegisteredHost -StorageSystem $StorageArray -HostName "Server01" -IpAddress "192.168.0.114" -HostBusAdapterIds $HostRegistration
To be continued.. :)
Posted in
Windows Server |
No Comment | 10,666 views | 26/06/2014 11:16
You can apply this Bios settings to HP Proliant DL980 and HP Proliant DL580 for your Microsoft SQL Servers.
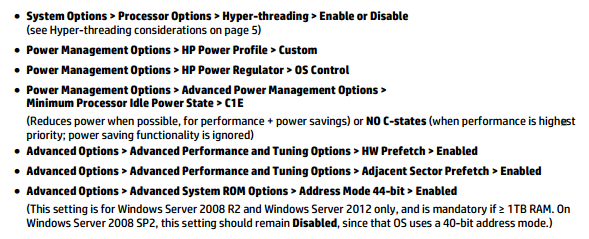
You can review full notes from “Best Practices for Tuning Microsoft SQL Server on the HP Proliant DL980 Server”:
Whitepaper is written for DL980 but HP confirms that Bios settings also applies for DL580.
Thanks to Bunyamin Topan for sharing this information :)
Posted in
Virtual Machine Manager,
Windows Powershell,
Windows Server |
No Comment | 2,037 views | 24/06/2014 09:42
You can update all SCVMM agents with following script:
1
2
3
4
5
6
7
| $Credential = Get-SCRunAsAccount -Name "Domain_Account"
$HyperVHosts = Get-SCVMMManagedComputer
foreach ($HyperVHost in $HyperVHosts)
{
$ManagedComputer = Get-SCVMMManagedComputer -ComputerName $HyperVHost
Update-SCVMMManagedComputer -Credential $Credential -VMMManagedComputer $HyperVHost
} |
$Credential = Get-SCRunAsAccount -Name "Domain_Account"
$HyperVHosts = Get-SCVMMManagedComputer
foreach ($HyperVHost in $HyperVHosts)
{
	$ManagedComputer = Get-SCVMMManagedComputer -ComputerName $HyperVHost
	Update-SCVMMManagedComputer -Credential $Credential -VMMManagedComputer $HyperVHost
}
That will update all Hyper-V hosts agents as soon as possible.
Posted in
Windows Powershell,
Windows Server |
3 Comments | 1,989 views | 23/06/2014 11:44
This is third version of Hyper-V Cluster Memory Reports.
1
2
3
4
5
6
7
8
9
10
11
12
13
14
15
16
17
18
19
20
21
22
23
24
25
26
27
28
29
30
31
32
| $Clusters = Get-Content Clusters.txt
foreach ($Cluster in $Clusters)
{
[int]$TotalFreeMemory = 0;
[int]$TotalMemory = 0;
[int]$TotalUsedMemory = 0;
[int]$NodeCount = 0;
$ClusterNodes = Get-Cluster $Cluster | Get-ClusterNode
foreach ($ClusterNode in $ClusterNodes)
{
[int]$FreeMemory = [math]::round(((Get-WmiObject -ComputerName $ClusterNode -Class Win32_OperatingSystem).FreePhysicalMemory / 1MB), 0) - ([math]::round(((Get-WmiObject -ComputerName $ClusterNode -Class Win32_OperatingSystem).TotalVisibleMemorySize / 1MB), 0)*10/100)
[int]$TotalFreeMemory = [int]$TotalFreeMemory + [int]$FreeMemory
[int]$NodeMemory = [math]::round(((Get-WmiObject -ComputerName $ClusterNode -Class Win32_OperatingSystem).TotalVisibleMemorySize / 1MB), 0)
[int]$TotalMemory = [int]$TotalMemory + [int]$NodeMemory
[int]$UsedMemory = [int]$NodeMemory - [int]$FreeMemory
[int]$TotalUsedMemory = [int]$TotalUsedMemory + [int]$UsedMemory;
[int]$NodeCount = [int]$NodeCount + 1
}
[int]$TotalAvailableMemory = [int]$TotalFreeMemory - [int]$NodeMemory - ([int]$NodeMemory*10/100)
Write-Host "Cluster: $Cluster"
Write-Host "Total Memory: $TotalMemory"
Write-Host "Total Free Memory: $TotalFreeMemory"
Write-Host "Total Used Memory: $TotalUsedMemory"
Write-Host "Total Available Memory: $TotalAvailableMemory"
Write-Host "Node Count: $NodeCount"
Write-Host " "
$Value = $Cluster + ";" + $TotalMemory + ";" + $TotalFreeMemory + ";" + $TotalUsedMemory + ";" + $TotalAvailableMemory + ";" + $NodeCount + ";" + $NodeMemory
Add-Content -Value $Value -Path Memory.txt
} |
$Clusters = Get-Content Clusters.txt
foreach ($Cluster in $Clusters)
{
	[int]$TotalFreeMemory = 0;
	[int]$TotalMemory = 0;
	[int]$TotalUsedMemory = 0;
	[int]$NodeCount = 0;
	$ClusterNodes = Get-Cluster $Cluster | Get-ClusterNode
	foreach ($ClusterNode in $ClusterNodes)
	{
		[int]$FreeMemory = [math]::round(((Get-WmiObject -ComputerName $ClusterNode -Class Win32_OperatingSystem).FreePhysicalMemory / 1MB), 0) - ([math]::round(((Get-WmiObject -ComputerName $ClusterNode -Class Win32_OperatingSystem).TotalVisibleMemorySize / 1MB), 0)*10/100)
		[int]$TotalFreeMemory = [int]$TotalFreeMemory + [int]$FreeMemory
		[int]$NodeMemory = [math]::round(((Get-WmiObject -ComputerName $ClusterNode -Class Win32_OperatingSystem).TotalVisibleMemorySize / 1MB), 0)
		[int]$TotalMemory = [int]$TotalMemory + [int]$NodeMemory
		[int]$UsedMemory = [int]$NodeMemory - [int]$FreeMemory
		[int]$TotalUsedMemory = [int]$TotalUsedMemory + [int]$UsedMemory;
		[int]$NodeCount = [int]$NodeCount + 1
	}
	[int]$TotalAvailableMemory = [int]$TotalFreeMemory - [int]$NodeMemory - ([int]$NodeMemory*10/100)

	Write-Host "Cluster: $Cluster"
	Write-Host "Total Memory: $TotalMemory"
	Write-Host "Total Free Memory: $TotalFreeMemory"
	Write-Host "Total Used Memory: $TotalUsedMemory"
	Write-Host "Total Available Memory: $TotalAvailableMemory"
	Write-Host "Node Count: $NodeCount"

	Write-Host " "

	$Value = $Cluster + ";" + $TotalMemory + ";" + $TotalFreeMemory + ";" + $TotalUsedMemory + ";" + $TotalAvailableMemory + ";" + $NodeCount + ";" + $NodeMemory
	Add-Content -Value $Value -Path Memory.txt
}
You should add your clusters into Clusters.txt file.
Posted in
Windows Powershell,
Windows Server |
No Comment | 13,349 views | 22/06/2014 17:35
My name is Yusuf Ozturk. I’m a PowerShell MVP and a system engineer at the Cloud team of a private bank where we have biggest Hyper-V production environment in Turkey. Managing large virtualization environment could be a headache if you don’t do your growing plans well or if you are growing quickly than you are expected. Patching Microsoft Updates to your Hyper-V Clusters could be problematic if you face with following issues:
1. Don’t have enough memory
2. Don’t have enough disk space
That means, your cluster is over-committed..
Also this issues could increase your pain in this scenario:
1. VMs with large memory (like 64GB memory or more)
2. VMs with vHBA
3. VMs with Passthrough Disks
Because you should do a good planing if you have large VMs in a over-committed environment because migrating that VMs won’t be an easy job than you think. Also misconfigured SAN switches, WWN configurations etc could be a problem for VMs with vHBa. Also drivers and firmwares could cause some issues for vHBA. As my experience, best way for migrating a VM with vHBA is keeping that offline. Otherwise you can lose disk connectivity anyway and it could damage your system, even you can lose data. So using clustered vHBA VMs can increase your uptime but also prevents data lose.
For the Passthrough disks, Hyper-V always get some issues with PT disks, couldn’t handle it well. So Microsoft doesn’t recommend it anymore maybe they will stop support with vNext, who knows..
So with this scenarios, current built-in Cluster-Aware Updating (CAU) has some problems:
1. CAU doesn’t know your VMs with vHBA or PT, because Cluster is handling them..
2. CAU doesn’t know your memory issue
3. CAU doesn’t know your disk issue
4. CAU doesn’t know if VM has a large memory
That’s why you can see that, Cluster tries to send a VM with 64 GB memory into a Hyper-V host with 32 GB free memory. Because Cluster only checks free memory in Cluster nodes. So i re-imagined CAU and wrote my own CAU process. What I do in my scenarion:
1. I can suspend VMs with vHBA and PT disk unless Cluster Node is online. (This is my choice, you can always use Live migrations)
2. I know which Cluster node has largest free memory. But what I know more is, which VM has largest memory as well. So I start with largest memory footprint VM, migrate it to best Cluster node. After that I can start migrating low memory VMs into that Host because there are still some memory for VMs like 2 GB, 4 GB etc..
3. I don’t leave migrations to Cluster Management. I do my own migrations. So that will give me my own control mechanism and that will give me flexibility. I can set timeout for VM migrations, so if a VM could not migrate in timely fashion, I can migrate it offline..
This is my own steps. You can always edit my script for your own requirements. Now lets see my new CAU script:


 home
home
 projects
 about
about
 contact
 follow
 feed
feed
 settings