home
home
 projects
 about
about
 contact
 follow
 feed
feed
 settings

Categories
Sponsors

Archive
 Blogroll
Badges

Community

|
Posted in Windows Powershell | 1 Comment | 3,497 views | 23/04/2013 16:55
Hello, PoSHStats for Exchange Server v2.2 is almost ready! Main Screenshot:
Example of Exchange Host Reporting:
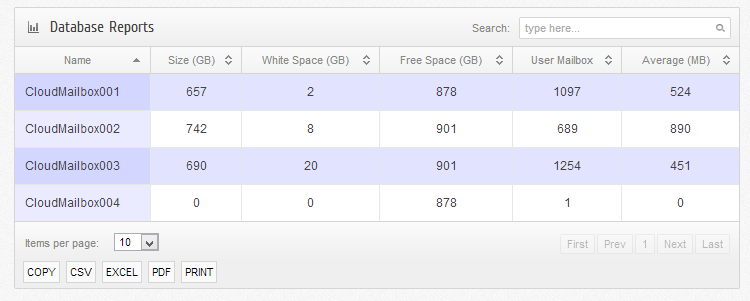
Example of Mailbox Database Reporting:
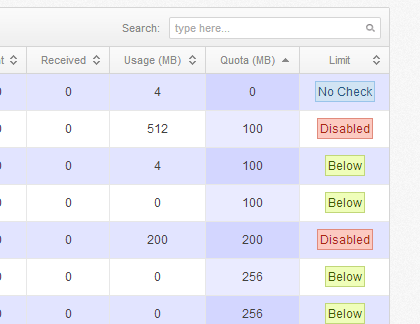
Example of User Mailbox Reporting:
It has a nice limit information bar :)
Also you can see service status of Exchange hosts:
This is not the final version of PoSHStats. Tested with 3000 mailboxes, everything seems ok. First time setup will take about 5-10 minutes depends on your environment. First download setup: Install setup.exe. After installation, open PowerShell and:
Give your hostname (like reports.poshstats.net or 192.168.2.1) and port number, then you are free to go. Thanks for using PoSHStats. Yusuf.
Posted in Windows Server | 1 Comment | 3,938 views | 14/04/2013 17:28
Boot into command prompt with Windows Server 2008 R2 DVD.
Change windows password by using Utilman (Windows Key + U) on logon screen.
After that, you should revert changes.
Posted in Windows Server | No Comment | 17,781 views | 11/04/2013 15:49
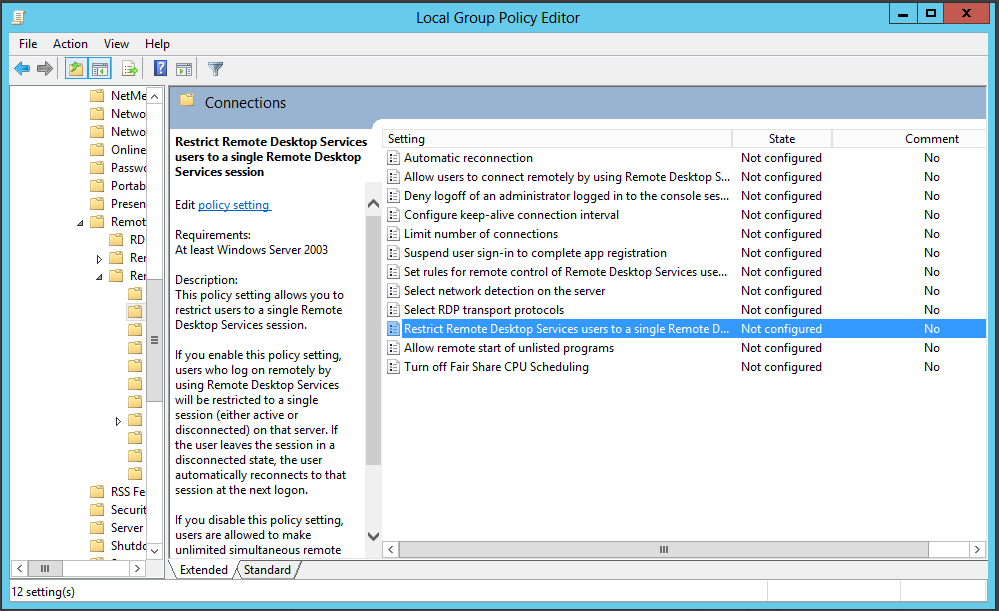
You can disable “Restrict each user to a single session” on Windows Server 2008 by using “Remote Desktop Session Host Configuration”. But that tool is not available on Windows Server 2012. So we should disable it from local policy to enable 2 sessions at the same time. Open run and type “gpedit.msc” for Local Group Policy. Go to: Computer Configuration\Administrative Templates\Windows Components\Remote Desktop Services\Remote Desktop Session Host\Connections
Simply disable “Remote Desktop Services users to single remote desktop session” option. After that you will be able to connect your server with 2 different session.
Posted in Windows Server | No Comment | 11,230 views | 10/04/2013 21:33
You may get Restricted User warning after a database restore if source database is MSSQL Server 2005.
After that, there will be no warning on your database.
Posted in Virtual Machine Manager, Windows Powershell | 10 Comments | 16,289 views | 04/04/2013 20:25
Hi guys and ladies! :) Update: v1.4 is here! Thanks for your feedbacks. Hyper-V VM Migration Script is ready! Now it’s possible to migrate your VMs from Hyper-V v2 to Hyper-V v3 with quick migration capabilities. It supports following scenarios: 1. Standalone Hyper-V v2 Host Update v1.4: Update v1.3: Update v1.2: So why it supports untrusted domains? Because you may not want to install Windows Server 2012 Cluster into your existing Windows Server 2008 R2 environment. If you have totally different environment for Hyper-V v3, then this script is your best friend. Advantages: 1. It supports BITS! It’s ready to move large VHD files. How to Install? 2. You can use exe or msi file to installation. I’ve just used migration.exe file to installation.
3. Change Powershell path if you have different drive path.
4. Click Install to begin installation.
5. That’s it! You can start using migration script.
6. Go to Powershell and type following to change execution policy as “AllSigned”.
7. Allow my code publishing certificate. This will prevent you to run untrusted scripts.
8. Installation is done! Now we can start migration of virtual machines. How to use? Example 1: If want to migrate VM01 from HV001 (10.10.10.2) to your local Hyper-V v3 host, use following:
BTW, -VMPath switch is the destination path. Not your current VM path. This script finds VM path automatically. Example 2: If HV001 (10.10.10.2) is a standalone machine, use following:
Example 3: If HV001 (10.10.10.2) is a member of a untrusted domain, use following:
Example 4: Having trouble with migration? Use debugging switch (-DebugMode) to see what really makes that problem:
Requirements: 1. You should install this script on to your Hyper-V v3 host. 2. This script doesn’t allow you to migrate VMs if they have snapshots. You should remove them first. 3. Requires Powershell v3. (It comes by default on Windows Server 2012) 4. Hyper-V v2 host and Hyper-V v3 host should have same network switch names. If they are different, this script connects first external network to your virtual machine. Thanks for using Hyper-V VM Migration script! -Yusuf.
Posted in Linux Server | No Comment | 3,923 views | 01/04/2013 17:15
If you need to extend your logical volume, do following first:
Then reboot your server! After that, you should do following to extend LVM:
You can control final size with this command:
You should see new disk size after this process. |