Categories
Sponsors

Archive
 Blogroll
Badges

Community

|
Posted in Exchange Server | No Comment | 3,657 views | 24/04/2012 00:15
If you have large Exchange organization with multiple servers and roles, you need to be careful about update. I’ve recently updated our Exchange Servers to Update Rollup 6. I want to share my experiences with update process.
First of all, you need to update roles with this order:
1. Client Access Servers
2. Hub Transport Servers
3. Mailbox Servers (DAG)
Client Access Servers:
If you have CAS Array, you don’t need to do any extra process, you can just install updates. After installation, reboot is not required but i rebooted all CAS servers to see what happens after reboot. It’s good to check services after reboot. If they are all started, then it’s successful.


Posted in Exchange Server, Windows Powershell | No Comment | 8,209 views | 26/07/2011 23:14
If you have an MTA, you have to configure Send-Connector to use that MTA as a smarthost. If that MTA is yours, then you can set relay on that server for your Exchange servers. But what about 3rd party MTA providers like DynDNS? They give you username/password for Basic Authentication and you can’t send email without that credentials. So we also need to set Basic Authentication on Send-Connector but how? Because Hosted Exchange 2010 SP1 has no GUI and Powershell requires System.Management.Automation.PSCredential to accept your credentials. I’ll show you how to solve this.
1
2
3
| $SecurePassword = ConvertTo-SecureString "PASSWORD_HERE" -AsPlainText -Force
$Credentials = new-object -typename System.Management.Automation.PSCredential -argumentlist "USERNAME_HERE", $SecurePassword
Get-SendConnector "SEND_CONNECTOR_HERE" | Set-SendConnector -DNSRoutingEnabled $false -SmartHosts 'SMARTHOST_HERE' -SmartHostAuthMechanism 'BasicAuth' -UseExternalDNSServersEnabled $false -AuthenticationCredential $Credentials |
$SecurePassword = ConvertTo-SecureString "PASSWORD_HERE" -AsPlainText -Force
$Credentials = new-object -typename System.Management.Automation.PSCredential -argumentlist "USERNAME_HERE", $SecurePassword
Get-SendConnector "SEND_CONNECTOR_HERE" | Set-SendConnector -DNSRoutingEnabled $false -SmartHosts 'SMARTHOST_HERE' -SmartHostAuthMechanism 'BasicAuth' -UseExternalDNSServersEnabled $false -AuthenticationCredential $Credentials For example you have an MTA service from DynDNS and your information:
Host: smtp.dyndns.org
Username: yusufozturk
Password: password
Default Send Connector: Internet Connector
So you should use this script for that informations:
1
2
3
| $SecurePassword = ConvertTo-SecureString "password" -AsPlainText -Force
$Credentials = new-object -typename System.Management.Automation.PSCredential -argumentlist "yusufozturk", $SecurePassword
Get-SendConnector "Internet Connector" | Set-SendConnector -DNSRoutingEnabled $false -SmartHosts 'smtp.dyndns.org' -SmartHostAuthMechanism 'BasicAuth' -UseExternalDNSServersEnabled $false -AuthenticationCredential $Credentials |
$SecurePassword = ConvertTo-SecureString "password" -AsPlainText -Force
$Credentials = new-object -typename System.Management.Automation.PSCredential -argumentlist "yusufozturk", $SecurePassword
Get-SendConnector "Internet Connector" | Set-SendConnector -DNSRoutingEnabled $false -SmartHosts 'smtp.dyndns.org' -SmartHostAuthMechanism 'BasicAuth' -UseExternalDNSServersEnabled $false -AuthenticationCredential $Credentials After this changes, you will be able to use your MTA.
Posted in Exchange Server, Windows Powershell | No Comment | 40,170 views | 30/06/2011 23:58
You can get DAG configuration with this script.
1
2
3
4
5
6
7
8
9
10
11
12
13
14
15
16
17
18
19
20
21
22
23
24
25
26
27
28
29
30
31
32
33
34
35
36
37
| $DAGMemberServersArray = New-Object System.Collections.ArrayList
If ($Selected.Count -eq "0")
{
Write-Host "You didn't choose any DAG configuration."
Write-Host " "
Write-Host " "
Read-Host "Press enter to go back"
}
else
{
foreach ($DAGConfMember in $Selected)
{
$DAGInfo = (Get-DatabaseAvailabilityGroup $DAGConfMember)
$DAGName = $DAGInfo.Name
$DAGWitnessServer = $DAGInfo.WitnessServer.fqdn
$DAGWitnessDirectory = $DAGInfo.WitnessDirectory.PathName
$DAGIPAddress = $DAGInfo.DatabaseAvailabilityGroupIpv4Addresses
Write-Host "DAG Name: $DAGName" -ForegroundColor Green
Write-Host "DAG Witness Server: $DAGWitnessServer" -ForegroundColor Green
Write-Host "DAG Witness Directory: $DAGWitnessDirectory" -ForegroundColor Green
Write-Host "DAG IP: $DAGIpAddress" -ForegroundColor Green
$DAGMemberServers = (Get-DatabaseAvailabilityGroup $DAGConfMember).Servers
Foreach ($DAGMemberServer in $DAGMemberServers)
{
$DAGMemberServersArray.Add("$DAGMemberServer") | Out-Null
}
Write-Host "Server Members: $DAGMemberServersArray" -ForegroundColor Green
Write-Host " "
Write-Host " "
$DAGMemberServersArray.Clear();
}
Read-Host "Press enter to go back"
$Selected.Clear();
} |
$DAGMemberServersArray = New-Object System.Collections.ArrayList

If ($Selected.Count -eq "0")
{
	Write-Host "You didn't choose any DAG configuration."
	Write-Host " "
	Write-Host " "
	Read-Host "Press enter to go back"
}
else
{
	foreach ($DAGConfMember in $Selected)
	{
		$DAGInfo = (Get-DatabaseAvailabilityGroup $DAGConfMember)
		$DAGName = $DAGInfo.Name
		$DAGWitnessServer = $DAGInfo.WitnessServer.fqdn
		$DAGWitnessDirectory = $DAGInfo.WitnessDirectory.PathName
		$DAGIPAddress = $DAGInfo.DatabaseAvailabilityGroupIpv4Addresses
		Write-Host "DAG Name: $DAGName" -ForegroundColor Green
		Write-Host "DAG Witness Server: $DAGWitnessServer" -ForegroundColor Green
		Write-Host "DAG Witness Directory: $DAGWitnessDirectory" -ForegroundColor Green
		Write-Host "DAG IP: $DAGIpAddress" -ForegroundColor Green
		$DAGMemberServers = (Get-DatabaseAvailabilityGroup $DAGConfMember).Servers
		Foreach ($DAGMemberServer in $DAGMemberServers)
		{
			$DAGMemberServersArray.Add("$DAGMemberServer") | Out-Null
		}
		Write-Host "Server Members: $DAGMemberServersArray" -ForegroundColor Green
		Write-Host " "
		Write-Host " "
		$DAGMemberServersArray.Clear();
	}

	Read-Host "Press enter to go back"

	$Selected.Clear();
} $Selected is an array of Mailbox Servers.
Posted in Exchange Server, Windows Powershell | No Comment | 4,758 views | 30/06/2011 23:54
This script checks all available hub transport servers for DAG membership.
1
2
3
4
5
6
7
8
9
10
11
12
13
14
15
16
17
18
19
20
21
22
23
24
25
26
27
28
29
30
31
32
33
34
| $AvailableHTServer = @(Get-ExchangeServer | where {$_.ServerRole -like "*HubTransport*" -and $_.ServerRole -notlike "*Mailbox*"})
$AvailableHTServerCount = $AvailableHTServer.Count
$DAGName = Read-Host "Enter a name for your DAG"
Write-Host " "
if ($AvailableHTServerCount -gt "0")
{
$AvailableHTServerName = $AvailableHTServer[0].Name
Write-Host "Would you like to use $AvailableHTServerName as a witness server?"
Write-Host "1) Yes"
Write-Host "2) No"
Write-Host " "
[int]$HTQuestion = Read-Host "Enter number to select an option"
Write-Host " "
if ($HTQuestion -eq "1")
{
$WitnessServer = $AvailableHTServerName
}
else
{
$WitnessServer = Read-Host "Enter witness server name (like $AvailableHTServerName)"
}
}
else
{
Write-Warning "There are no suitable Hub Transport servers as a witness server."
Write-Warning "You should enter a witness server which has no Mailbox role on it."
Write-Warning "Make sure that the group Exchange Trusted Subsystem is added to the local administrators of the server that will be the witness server."
Write-Host " "
$WitnessServer = Read-Host "Enter witness server name"
} |
$AvailableHTServer = @(Get-ExchangeServer | where {$_.ServerRole -like "*HubTransport*" -and $_.ServerRole -notlike "*Mailbox*"})
$AvailableHTServerCount = $AvailableHTServer.Count

$DAGName = Read-Host "Enter a name for your DAG"
Write-Host " "

if ($AvailableHTServerCount -gt "0")
{
	$AvailableHTServerName = $AvailableHTServer[0].Name

	Write-Host "Would you like to use $AvailableHTServerName as a witness server?"
	Write-Host "1) Yes"
	Write-Host "2) No"
	Write-Host " "
	[int]$HTQuestion = Read-Host "Enter number to select an option"
	Write-Host " "

	if ($HTQuestion -eq "1")
	{
		$WitnessServer = $AvailableHTServerName
	}
	else
	{
		$WitnessServer = Read-Host "Enter witness server name (like $AvailableHTServerName)"
	}
}
else
{
	Write-Warning "There are no suitable Hub Transport servers as a witness server."
	Write-Warning "You should enter a witness server which has no Mailbox role on it."
	Write-Warning "Make sure that the group Exchange Trusted Subsystem is added to the local administrators of the server that will be the witness server."
	Write-Host " "
	$WitnessServer = Read-Host "Enter witness server name"
} You can use $WitnessServer for provisioning.
Posted in Exchange Server, Windows Powershell | No Comment | 5,091 views | 30/06/2011 23:47
Hello,
You can use this script as a function to prepare Active Directory for HE 2010.
1
2
3
4
5
6
7
8
9
10
11
12
13
14
15
16
17
18
19
20
21
22
23
24
25
26
27
28
29
30
31
32
33
34
35
36
37
38
39
40
41
42
43
44
45
46
47
48
| $ErrorCode = $Null
Import-Module ServerManager
$ADStatus = (Get-WindowsFeature RSAT-ADDS).Installed
If ($ADStatus -ne $True)
{
Write-Warning "You should install Active Directory Administration Tools (RSAT-ADDS)"
Write-Host " "
Write-Warning "Aborting.."
Start-Sleep 3
$ErrorCode = "500"
}
If ($ErrorCode -eq $Null)
{
Write-Host " "
$OrganizationName = Read-Host "Organization Name"
Write-Host " "
$CurrentLocation = (Get-Location).Path
$SetupFile = $CurrentLocation + "\setup.com"
If (!(Test-Path -Path $SetupFile))
{
$SetupFilePath = Read-Host "Setup File Path"
$SetupFile = $SetupFilePath + "\setup.com"
If (!(Test-Path -Path $SetupFile))
{
Write-Warning "Could not find setup.com file."
Write-Host " "
Write-Warning "Aborting.."
Start-Sleep 3
$ErrorCode = "550"
}
}
}
If ($ErrorCode -eq $Null)
{
&"$SetupFile" /PrepareAD /OrganizationName:$OrganizationName /hosting
Write-Host " "
Write-Host "AD preparation completed successfully."
Start-Sleep 3
$PrepareADStatus = "Completed"
}
else
{
$PrepareADStatus = "Failed"
} |
$ErrorCode = $Null
Import-Module ServerManager
$ADStatus = (Get-WindowsFeature RSAT-ADDS).Installed

If ($ADStatus -ne $True)
{
	Write-Warning "You should install Active Directory Administration Tools (RSAT-ADDS)"
	Write-Host " "
	Write-Warning "Aborting.."
	Start-Sleep 3
	$ErrorCode = "500"
}

If ($ErrorCode -eq $Null)
{
	Write-Host " "
	$OrganizationName = Read-Host "Organization Name"
	Write-Host " "
	$CurrentLocation = (Get-Location).Path
	$SetupFile = $CurrentLocation + "\setup.com"
	If (!(Test-Path -Path $SetupFile))
	{
		$SetupFilePath = Read-Host "Setup File Path"
		$SetupFile = $SetupFilePath + "\setup.com"

		If (!(Test-Path -Path $SetupFile))
		{
			Write-Warning "Could not find setup.com file."
			Write-Host " "
			Write-Warning "Aborting.."
			Start-Sleep 3
			$ErrorCode = "550"
		}
	}
}

If ($ErrorCode -eq $Null)
{
	&"$SetupFile" /PrepareAD /OrganizationName:$OrganizationName /hosting
	Write-Host " "
	Write-Host "AD preparation completed successfully."
	Start-Sleep 3
	$PrepareADStatus = "Completed"
}
else
{
	$PrepareADStatus = "Failed"
} Setup.com stores in Exchange 2010 SP1 DVD.
Posted in Exchange Server, Windows Powershell | 7 Comments | 11,716 views | 30/06/2011 23:05
Hello,
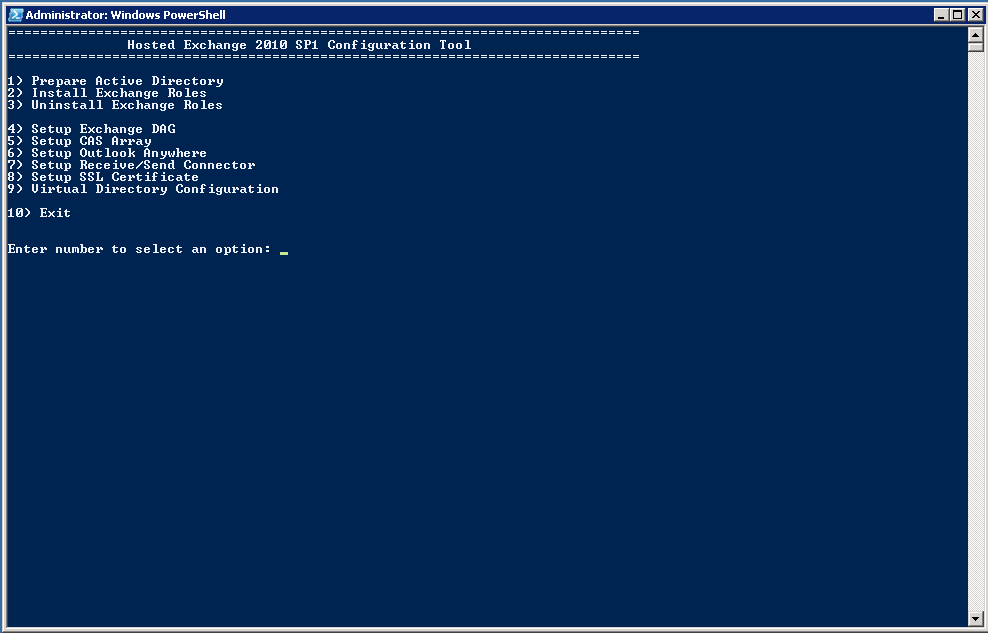
I’m happy to pronounce my new Powershell tool. I’m sure that will help who wants to install Hosted Exchange.
Functionalities:
1) Prepare Active Directory: Prepares existing active directory to install Hosted Exchange 2010 SP1.
2) Install Exchange Roles: Helps you to install Exchange roles unattended.
3) Uninstall Exchange Roles: Helps you to uninstall Exchanges roles which you don’t need anymore.
4) Setup Exchange DAG: Sets up Exchange DAG, Witness Directory and IP/Subnet Configuration for Cluster.
5) Setup CAS Array: Creates Client Access Arrays, helps you to assign members
6) Setup Outlook Anywhere: Enables Outlook Anywhere and configures RPC service.
7) Setup Receive/Send Connector: Helps you to configure Hub Transport servers.
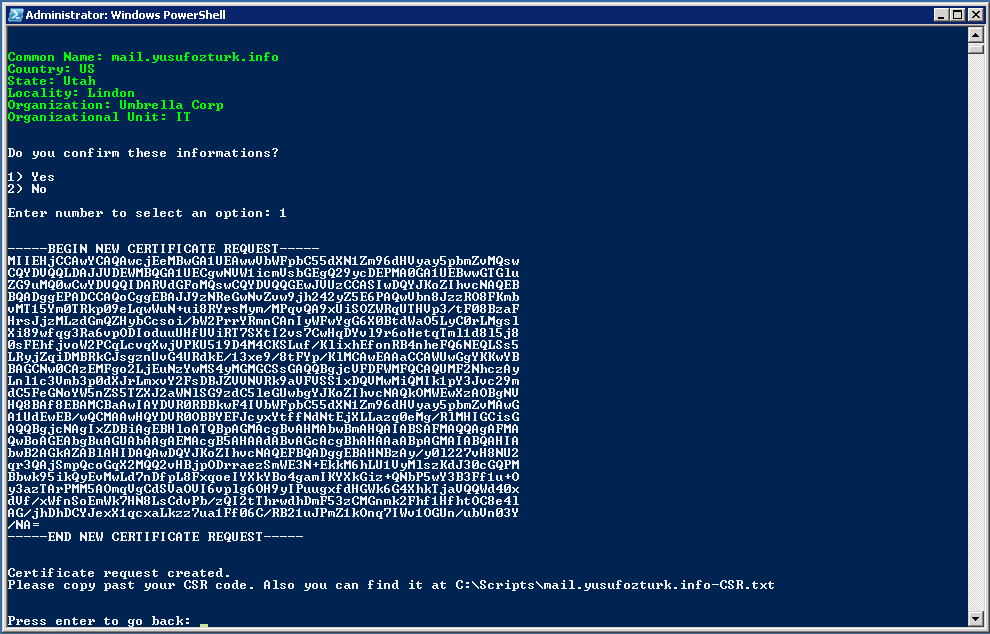
8) Setup SSL Certificate: Helps you to create CSR, Import/Export SSL Certificates and assign services
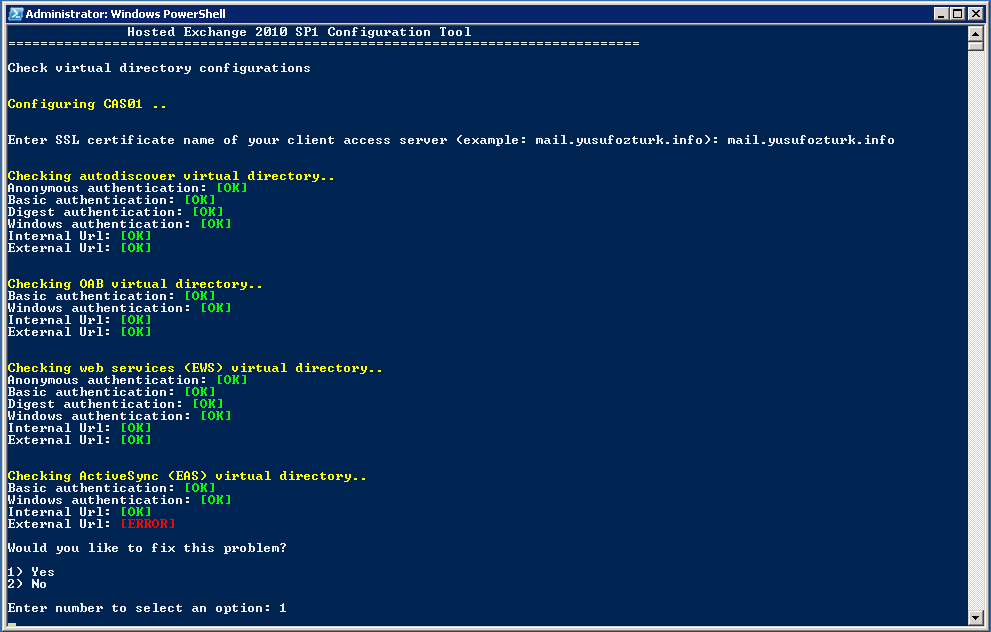
9) Virtual Directory Configuration: Checks the virtual directories and fix them if they are not default.
Download:
Donate: Thanks to support this open source project!
Usage:
1. First, you should allow signed Powershell scripts:
Set-ExecutionPolicy AllSigned |
Set-ExecutionPolicy AllSigned 2. Go to directory and execute start.ps1:
Sponsor: Applied Innovations

Posted in Exchange Server, Windows Powershell | No Comment | 4,583 views | 05/01/2011 16:29
Gerekli işletim sistemi bileşenlerini Powershell kullanarak kurabilirsiniz.
Öncelikle ServerManager modülünü import edin:
Import-Module ServerManager |
Import-Module ServerManager Şimdi gerekli bileşenleri yükleyebilirsiniz:
Add-WindowsFeature NET-Framework,RSAT-ADDS,Web-Server,Web-Basic-Auth,Web-Windows-Auth,Web-Metabase,Web-Net-Ext,Web-Lgcy-Mgmt-Console,WAS-Process-Model,RSAT-Web-Server,Web-ISAPI-Ext,Web-Digest-Auth,Web-Dyn-Compression,NET-HTTP-Activation,RPC-Over-HTTP-Proxy -Restart |
Add-WindowsFeature NET-Framework,RSAT-ADDS,Web-Server,Web-Basic-Auth,Web-Windows-Auth,Web-Metabase,Web-Net-Ext,Web-Lgcy-Mgmt-Console,WAS-Process-Model,RSAT-Web-Server,Web-ISAPI-Ext,Web-Digest-Auth,Web-Dyn-Compression,NET-HTTP-Activation,RPC-Over-HTTP-Proxy -Restart Bu bileşenler sadece CAS rolü için geçerlidir.
|

 home
home
 projects
 about
about
 contact
 follow
 feed
feed
 settings